The traditional Google AdSense installation is not compatible with the websites created using Next JS. Next JS’s conventional Adsense implementation is sometimes successful but isn’t always. And there is no official way to implement Google Adsense in Next JS. In this article, you will learn How to add Google AdSense in Next JS. After reading this article you will be able to display In-page ads, Anchor ads, Vignette ads and Unit Ads on your Next JS website.
Register in Google Adsense
1. First go to Google Adsense Website and Click on Get Started. After that log in with your Google account.
2. Next you will get a form. Update with your site details. Select your country and select the “I have read and accept the agreement” checkbox. Remember that you can change your country later. Now click on Start using Adsense Button.
3. Now you have to verify that you are the owner of the site. You can do that via the Google search console or by adding the txt record in your DNS settings.
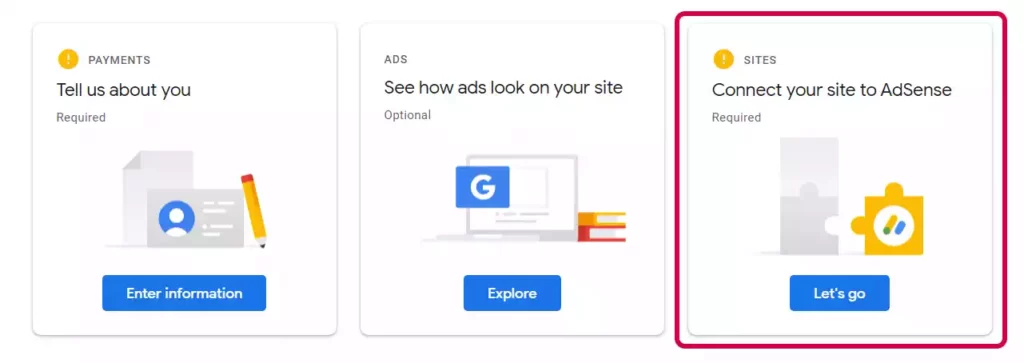
4. Now in the home section click on Connect your site to AdSense to get the Google AdSense code.
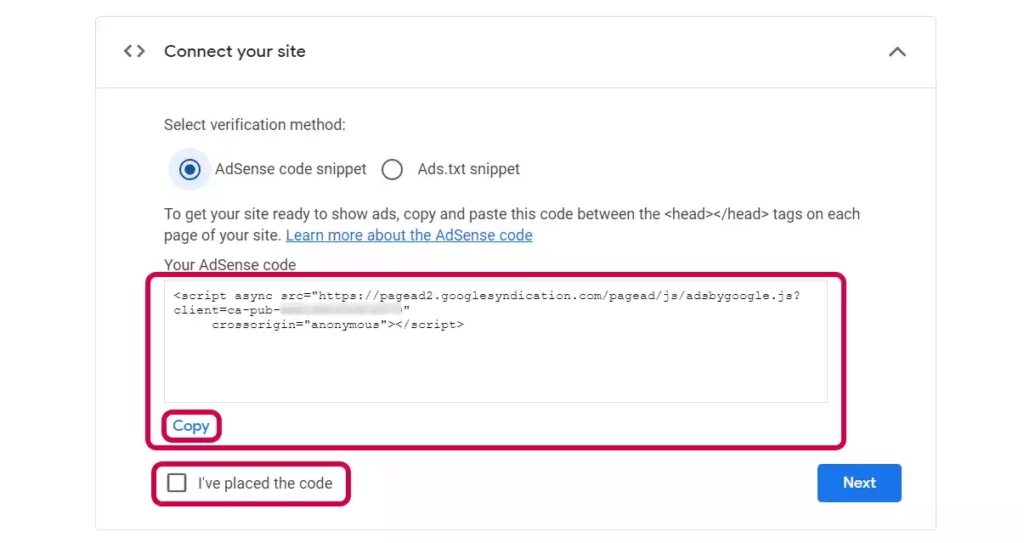
5. Now you will get two options. One is “AdSense code snippet” and the other is “Ads.txt snippet“. We will have to add both to our website.
6. Now we will add the AdSense code. In the AdSense code snippet, click on the copy button and copy it.
// Code from AdSense
<script async src="https://pagead2.googlesyndication.com/pagead/js/adsbygoogle.js?client=ca-pub-xxxxxxxxxxxxxxxxx"
     crossorigin="anonymous"></script>
Also Read: How to add Next JS Redirect
AdSense Auto Ads setup in Next JS
Once you have added the AdSense Auto Ads code to your website, you can configure it by logging in to your AdSense account and navigating to the “Ads” section. Click on “Ad Units” and then “Auto ads”. Here you can configure the ad formats, ad placements, and other settings for your AdSense Auto Ads. But first, we will add the AdSense code to our project for the auto Ads.
How to Add the AdSense script on Next js?
7. You will only need to load the adsbygoogle.js in Next JS after the page initially loaded. That means we need to add the code in a place which loads every time the user landed on any page. And _app.js is the perfect place for it. We will also use the Next JS Script component instead of the HTML script. This will optimize our page. So let’s modify the code a bit.
// _app.js
<Script
  id="adsbygoogle-init"
  strategy="afterInteractive"
  crossOrigin="anonymous"
  src= "https://pagead2.googlesyndication.com/pagead/js/adsbygoogle.js?client=ca-pub-xxxxxxxxxxxxxxx"
/>
Now check the “I’ve placed the code” and click on the next button.
Also Read: How to Highlight Code Syntax in Next JS
How to Add the AdSense ads.txt file on Next js?
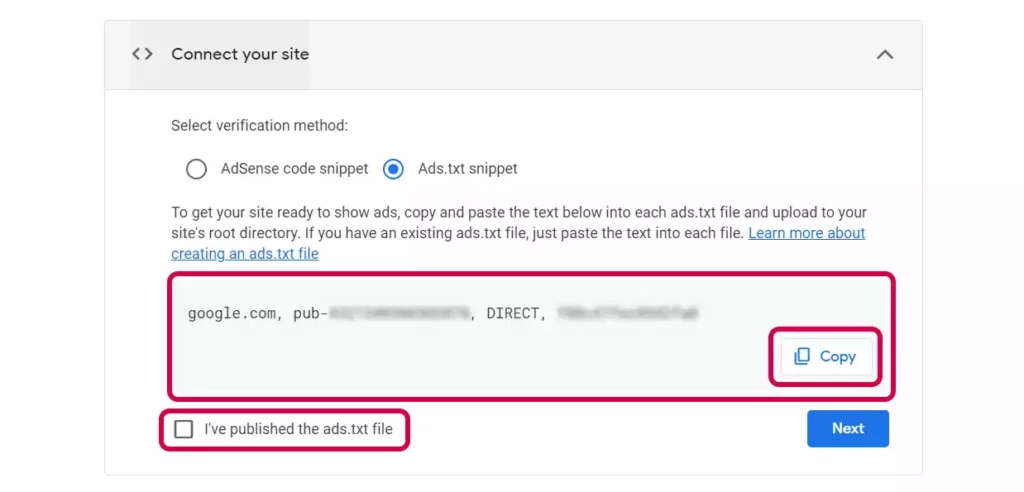
8. Let’s add the ads.txt. Click on copy and the code will be copied to your clipboard. Now in your Next JS application go to the public folder and create an ads.txt file and Paste the copied code.
// /public/ads.txt
google.com, pub-xxxxxxxxxxxxxxxx, DIRECT, xxxxxxxxxxxxxx
After Adding the code click on I’ve published the ads.txt file and click next.
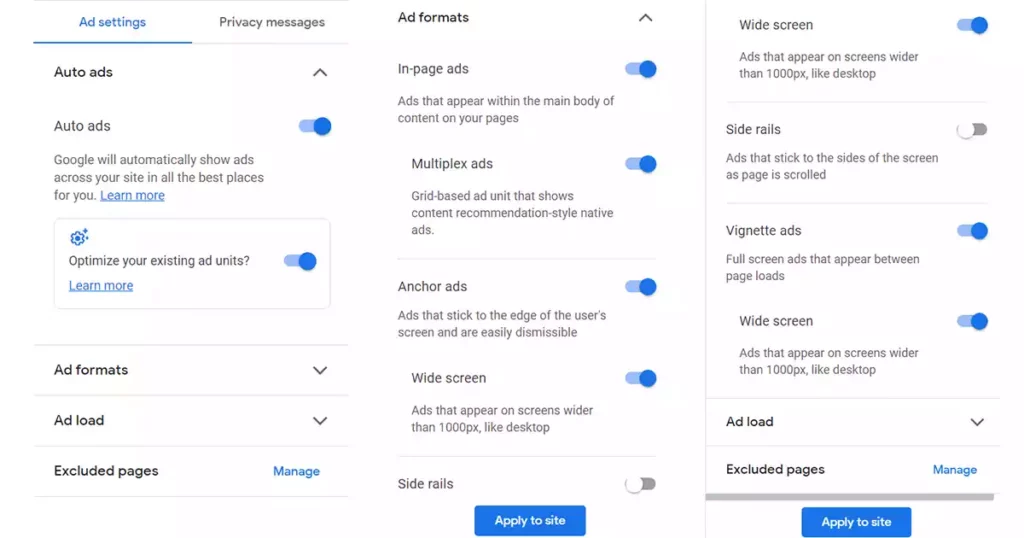
9. Click on ads on the slide bar and click on your site. Now you will get settings for your site. You can enable or disable different types of ads here like In-page ads, Anchor ads, and Vignette ads. You can choose Auto ads and then Google will handle the ads. Here are the ad settings that I use.
That’s it, the initial AdSense code setup is done for our Next JS website. Now we will add the Unit Ads.
Also Read: How to use Next js Environment Variables
Test AdSense Auto Ads
It is important to test your AdSense Auto Ads to make sure they are working properly. You can do this by visiting your website and checking that the ads are being displayed in the correct locations. You can also use the AdSense preview tool to see how your ads will look on your website.
Also Read: How to use both Tailwind and Styled Components in Next JS
How to Add the Unit Ads on Next js?
When you want to add to a specific page or in a specific section the Unit Ads are the best. Google Adsense has many types of unit ads. Let’s check how we can add Unit Ads on Next js.
1. First go to “Ads” from the sidebar and click on the unit ads tab. You will find 4 types of unit ads. We will choose “Display ads” for this article.
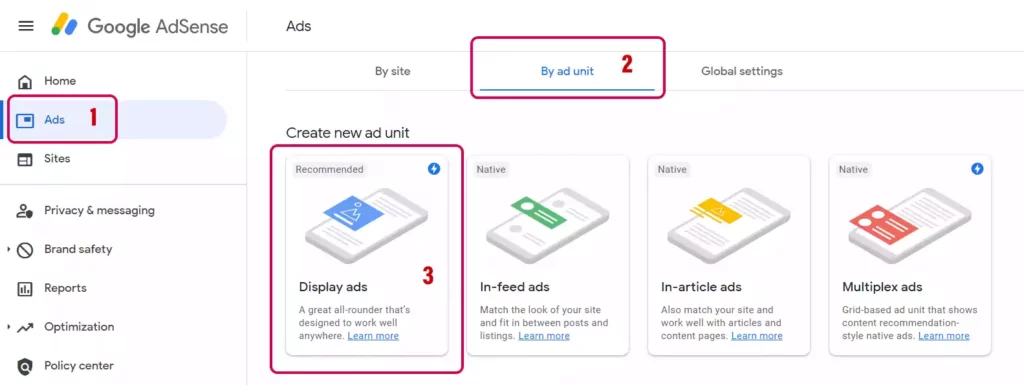
2. Now you will see a preview of the ad. Give the ad a name. You can check the preview in the square, vertical and horizontal modes. Keep the ad size to responsive, that works best. And now click on save.

3. You will get the code snippet for the ad. Copy that snippet. We will add that in our Next JS app.
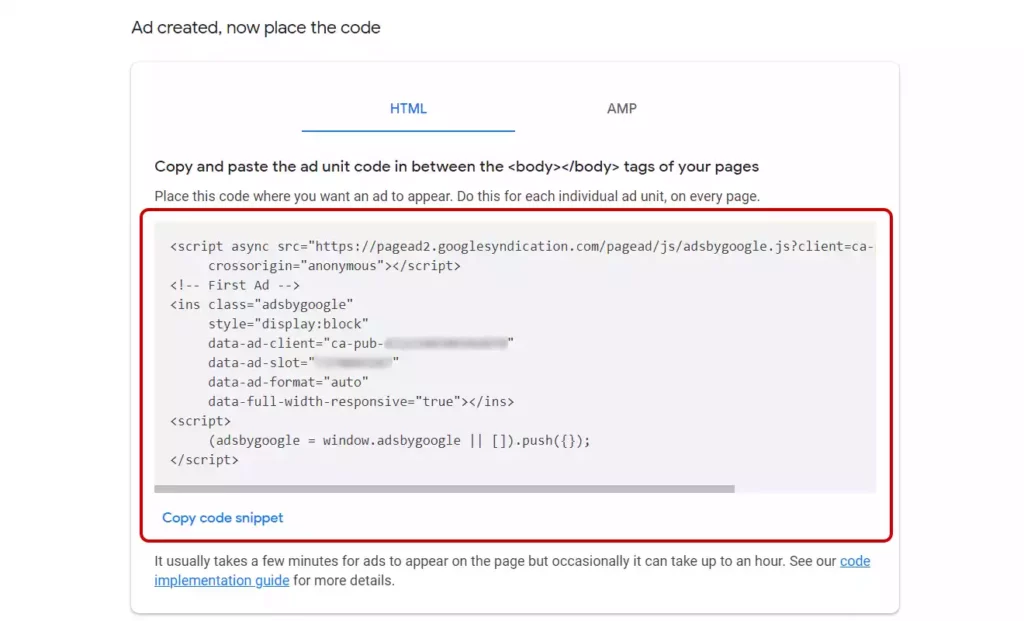
// Ad Unit Code
<script async src="https://pagead2.googlesyndication.com/pagead/js/adsbygoogle.js?client=ca-pub-xxxxxxxxxxxxxx"
     crossorigin="anonymous"></script>
<!-- First Ad -->
<ins class="adsbygoogle"
     style="display:block"
     data-ad-client="ca-pub-xxxxxxxxxxxxxxx"
     data-ad-slot="xxxxxxxxxx"
     data-ad-format="auto"
     data-full-width-responsive="true"></ins>
<script>
     (adsbygoogle = window.adsbygoogle || []).push({});
</script>
4. We can add this AdSense code in our code by following two methods
Method 1: Add AdSense Unit Ads in code directly
1. Before adding the code snippet to our code, we will make some changes to the Ad code. Remove the script code from the snippet. We have already added the code in the global settings. Remove the (adsbygoogle = window.adsbygoogle || []).push({}); script also. We will add that separately. Now we have code with ins tag. Add That code in your Next JS app where you want to show the unit ad. Before that change the style a bit. This is how our AdSense Unit Ad code will look like –
<ins className="adsbygoogle"
     style={{ display: 'block' }}
     data-ad-client="ca-pub-xxxxxxxxxxxxxxx"
     data-ad-slot="xxxxxxxxxx"
     data-ad-format="auto"
     data-full-width-responsive="true"></ins>
2. Now we have to initialize the Unit Ad code. We have to add an useEffect on our _document.js page. The unit code has a adsbygoogle className. We will initialize our Ad with that. To determine the quantity of ad unit occurrences, we may utilise the already-existing ad unit class name adsbygoogle. Additionally, run the push script an equal number of times.
useEffect(() => {
  var ads = document.getElementsByClassName('adsbygoogle').length;
  for (var i = 0; i < ads; i++) {
    try {
      (window.adsbygoogle = window.adsbygoogle || []).push({});
    } catch (e) {}
  }
}, []);
Also Read: Next JS Typescript: Everything You Need to Know
Method 1: Add AdSense Unit Ads with NPM Package
1. In this method we are going to use an npm package named @ctrl/react-adsense. Install this package in your app by using npm or yarn
npm install @ctrl/react-adsense
or
yarn add @ctrl/react-adsense
2. Now add the AdSense script using Next Script in _app.js file. We are using strategy afterInteractive as this will be used for unit ads
<Script
  async
  src="https://pagead2.googlesyndication.com/pagead/js/adsbygoogle.js"
  strategy="afterInteractive"
/>
3. We will also create a reusable Ad component so that we can use the AdSense component again and again. Add your AdSense Client and Ad slot that you got in the previous step.
import React from "react";
import { Adsense } from "@ctrl/react-adsense";

function Ads() {
  return (
    <div className="text-center adsbygoogle my-3">
      <Adsense
        client="ca-pub-**********"
        slot="use-your-slot-id-here"
        style={{ display: "block" }}
        layout="in-article"
        format="fluid"
      />
    </div>
  );
}
4. The package provides various types of Ad components that you can use. Here are three Ad component examples that you can use. The best option for me is responsive and native ads.
import React from 'react';
import {Adsense} from '@ctrl/react-adsense';

// ads with no set-up
<Adsense
  client="ca-pub-7640562161899788"
  slot="7259870550"
/>

// ads with custom format
<Adsense
  client="ca-pub-7640562161899788"
  slot="7259870550"
  style={{ width: 500, height: 300 }}
  format=""
/>

// responsive and native ads
<Adsense
  client="ca-pub-7640562161899788"
  slot="7259870550"
  style={{ display: 'block' }}
  layout="in-article"
  format="fluid"
/>
Also Read: How to Add Google Analytics in NextJS
Conclusion
The Adsense issue with Next js apps will be resolved by this solution. Let’s say your page has any client-side rendered elements, such as sidebars loaded asynchronously. The Adsense initialization script must then be run after all of the ad units have loaded into the screen in that situation.
You may also like
Types of APIs: A Complete Guide to API Categories

Aug 23, 2025
·3 Min Read
Have you ever wondered how your favorite apps talk to each other? Think about logging into a game with your Google account or paying through PayPal on an e-commerce site. That’s all possible because of APIs. They’re like digital messengers, making sure systems communicate smoothly. But did you know there are different types of APIs […]
Gemini CLI: Google’s Open Source AI Terminal Agent

Jun 26, 2025
·4 Min Read
Google has once again reshaped the future of developer productivity and AI-assisted coding by launching Gemini CLI, an open-source AI agent that seamlessly integrates the power of Gemini AI directly into your terminal. With 1,000 free requests per day, instant access to automated coding tasks, and the ability to generate images, videos, and website templates, […]
How to add Google Web Stories in Next JS

Dec 14, 2023
·10 Min Read
In the fast-paced digital world, user engagement is key to the success of any website. One effective way to captivate your audience is by incorporating Google Web Stories into your Next JS website. These visually appealing and interactive stories can make your content more engaging and shareable. In this comprehensive guide, we’ll walk you through […]
How to send Emails in Next JS for Free using Resend

Nov 10, 2023
·7 Min Read
Sending emails in web applications is a crucial feature, and in this article, we will explore how to send Emails in Next JS for free using Resend. Next JS is a popular framework for building React applications, and Resend is a handy tool for email integration. By the end of this guide, you’ll have the […]
How to add Google Login in Next.js with Appwrite

Nov 01, 2023
·7 Min Read
Are you looking to enhance user authentication in your Next.js application? Integrating Social Login with Appwrite can be a game-changer. Add Google Login to your Next.js app with Appwrite. This article will guide you through the process, and practical tips to add Google Login in Next.js with Appwrite. GitHub Code: Google Login in Next.js with […]
JavaScript Project Ideas to Boost Your Portfolio

Oct 13, 2023
·3 Min Read
JavaScript is the backbone of web development, and mastering it is essential for any aspiring developer. While learning the basics is crucial, building real-world projects is the key to solidifying your knowledge. In this comprehensive guide, we’ll present a diverse range of JavaScript project ideas that cater to different skill levels and interests. These projects […]