How to use GitHub GraphQL API in React or Next JS

Mridul Panda
Jan 24, 2023
·8 Min Read

An application programming interface (API) is the easiest way for applications to communicate with each other. And with the help of API, we can make out own UI with the help of existing data available on the internet. There are two major types of API available – REST API and GraphQL API. GitHub has also an API for user data, repository data, pull requests data, issues data, commit data and many more things. GitHub API has both REST API and GraphQL API. The REST API has some rate limit issues. You can only call the API 50 times in an hour and after that, you will get a rate limit error. So we are going to use the GraphQL version of the API. In this article, you are going to learn How to use GitHub GraphQL API in React or Next JS application.
Generate token for GitHub API Authentication
To makes API calls we need to authenticate ourselves first. We need to generate a GitHub token for that. So you need a GitHub account must. If you don’t have a GitHub account, go to GitHub SIgnup Page and make an account first. Now we will generate a token with the following steps
1. Navigate to the settings of your profile and go to the apps section from the sidebar. You directly go to the apps section from this.
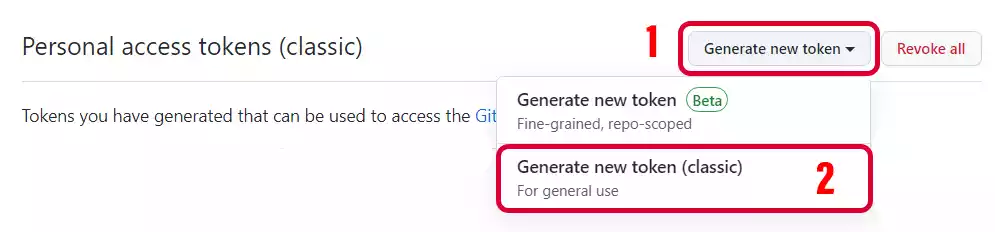
2. Now click on Personal Access Tokens and then Tokens(classic).
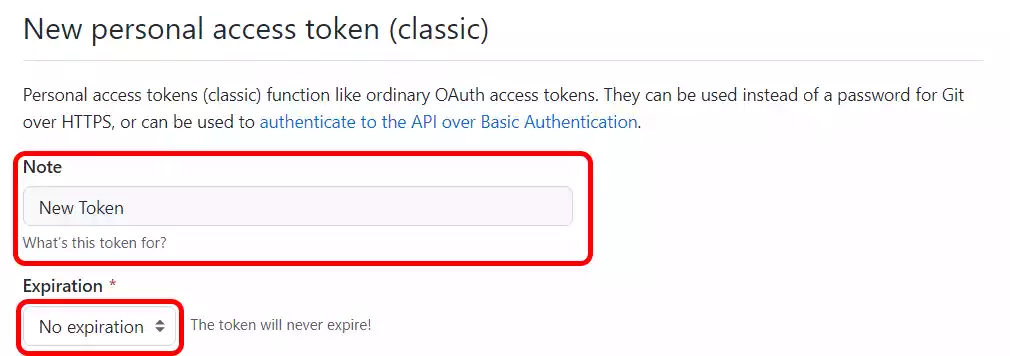
3. Give your token a good and meaningful name so that you can recognize it later and set the expiration date to No Expiration.
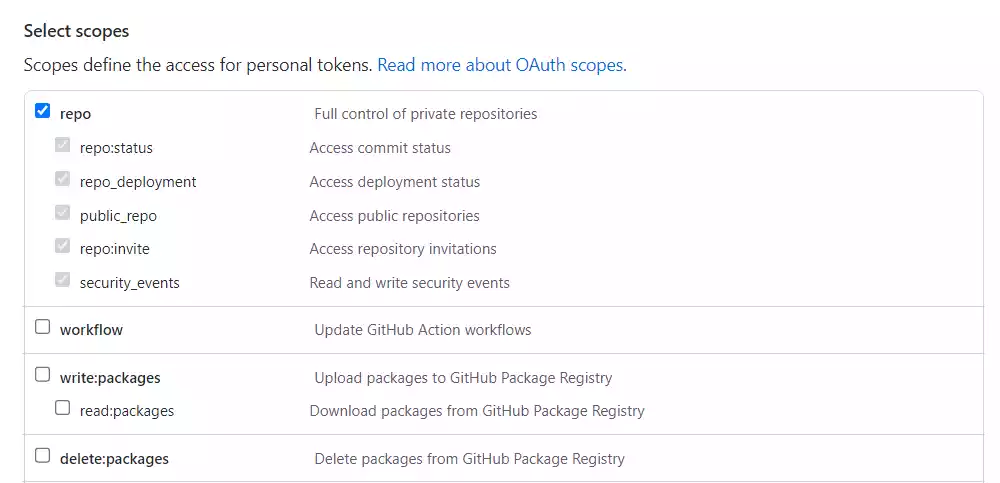
4. Now select items from scops. Read all the scopes and choose what you need. You will get access to only those data that you select. But carefully select from the list. For this article, we are selecting the repo one. After selection click on Generate Token button
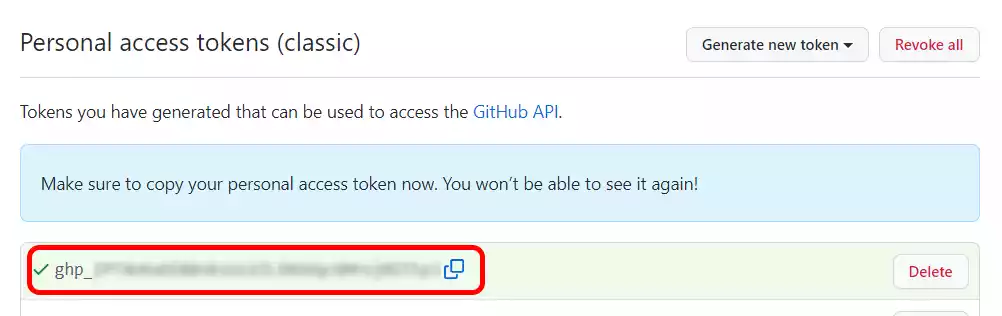
5. After that you will see your GitHub token on your screen. But make sure to copy the token and save it somewhere. You won’t be able to see the token again!
That’s it. We now have our GitHub token for API authentication. We will be using the token in the next step.
How to use GitHub GraphQL API in Next JS
If you want the full example code you can find it on GitHub.
1. Let’s create a Next JS project first. We will name the project github-graphql-next-js
npx create-next-app github-graphql-next-js

#or
yarn create-next-app github-graphql-next-js
cd github-graphql-next-js2. After that we need to install some packages for Grapql API. Let’s install @apollo/client and graphql
npm i @apollo/client graphql dotenv3. Create a .env file in the root directory and save the generated token that we created in the previous step. And add the .env to your .gitignore file. We don’t want our token to get public on GitHub.
// .env
GITHUB_TOKEN = <YOUR_GITHUB_TOKEN>
4. Now we have to add the env variable in the next.config.js file so that we can access it from our project. Your next.config.js will look something like this –
// next.config.js
require('dotenv').config();

const nextConfig = {
  reactStrictMode: true,
  swcMinify: true,
  env: {
    GITHUB_TOKEN: process.env.GITHUB_TOKEN,
  },
}

module.exports = nextConfig
ApolloClient create for API authorization
5. In the next step we will create a ApolloClient to connect to the GitHub GraphQL API and authenticate with our token. For that, we will create a client.js file in the root folder.
// client.js
import { ApolloClient, InMemoryCache, createHttpLink } from '@apollo/client';
import { setContext } from '@apollo/client/link/context';

const { GITHUB_TOKEN } = process.env;

// Create the http link
const httpLink = createHttpLink({
  uri: 'https://api.github.com/graphql',
});

// Generate and set the header with the auth details
const authLink = setContext((_, { headers }) => {
  // get the authentication token from env variables if it exists
  const token = GITHUB_TOKEN;

  // return the headers to the context so httpLink can read them
  return {
    headers: {
      ...headers,
      authorization: `Bearer ${token}`,
    },
  };
});

// Generate your client with the authLink and httpLink
export const client = new ApolloClient({
  cache: new InMemoryCache(),
  link: authLink.concat(httpLink),
});
As you can see the endpoint for the GraphQL API is api.github.com/graphql. And we have passed the token in headers with Bearer keyword and passed in authorization key. We have also enabled the cache with InMemoryCache().
Also Read: Next JS Project Ideas to Boost Your Portfolio
6. Let’s make a simple query and fetch data with that. We will create a Query.js file in the GraphQL folder. This is just to separate the query file from the fetch file for clean code. We are using 2 variables here $username for the user name and $repository for repository name
import { gql } from "@apollo/client";

export const GET_REPOSITORY = gql`
  query getRepository($username: String!, $repository: String!) {
    repository(name: $repository, owner: $username) {
      isFork
      isTemplate
      isArchived
      url
      forks {
        totalCount
      }
      stargazers {
        totalCount
      }
      name
      description
    }
  }
`;
7. Next, we will fetch the data for next.js the repository on our home page in the Next JS getStaticProps function. The API call will look like this
export async function getStaticProps() {
  const { data } = await client.query({
    query: GET_REPOSITORY,
    variables: {
      username: "vercel",
      repository: "next.js",
    },
  });

  return {
    props: {
      data,
    },
  };
}
8. Now if we check our console we can see the data for next.js the official repository. The sample data will look like this
{
  repository: {
    __typename: 'Repository',
    isFork: false,
    isTemplate: false,
    isArchived: false,
    url: 'https://github.com/vercel/next.js',
    forks: { __typename: 'RepositoryConnection', totalCount: 21502 },
    stargazers: { __typename: 'StargazerConnection', totalCount: 99480 },
    name: 'next.js',
    description: 'The React Framework'
  }
}
Use this data anywhere you in your page and make beautiful UI with it.
If you want a more complex query for GitHub GraphQL API you can check git-o-get. With Git O Get you can get Github Profile Stats, Language Graphs, Social Card, Contribution Graph, Repository Stats, Graphs and more. So check out the repository if you want more knowledge on the GitHub Graphql API.
Also Read: How to Highlight Code Syntax in Next JS
How to use GitHub GraphQL API in React JS
In the case of React JS, the fetching is a bit different. Let’s look at the steps
If you want the full example code for the React JS you can find it on GitHub.
1. First we will create a React JS Project. In this, our app name will be github-graphql-react-js. For that run the following command –
// with npm
npx create-react-app github-graphql-react-js

// with yarn
yarn create-react-app github-graphql-react-js
cd github-graphql-react-js2. We have to install some packages for the Grapql API call. Let’s install @apollo/client and graphql
npm i @apollo/client graphql3. Create a .env file in the root directory and save the generated token that we created in the previous step. And add the .env to your .gitignore file. The env variable will be a bit different here
// .env
REACT_APP_GITHUB_TOKEN = <YOUR_GITHUB_TOKEN>
4. In the next step we will create a ApolloClient to connect to the GitHub GraphQL API and authenticate with our token. For that, we will create a client.js file in the src folder and add the same client as the Next JS project
// /src/client.js
import { ApolloClient, InMemoryCache, createHttpLink } from "@apollo/client";
import { setContext } from "@apollo/client/link/context";

// Create the http link
const httpLink = createHttpLink({
  uri: "https://api.github.com/graphql",
});

// Generate and set the header with the auth details
const authLink = setContext((_, { headers }) => {
  // get the authentication token from env variables if it exists
  const token = process.env.REACT_APP_GITHUB_TOKEN;

  // return the headers to the context so httpLink can read them
  return {
    headers: {
      ...headers,
      authorization: `Bearer ${token}`,
    },
  };
});

// Generate your client with the authLink and httpLink
export const client = new ApolloClient({
  cache: new InMemoryCache(),
  link: authLink.concat(httpLink),
});
Also Read: How to add Google AdSense in Next JS
5. Now we need to wrap the index with ApolloProvider so that we can access it from anywhere in the project and pass the client into it. Now out index.js file will look like this.
// /src/index.js
import React from "react";
import ReactDOM from "react-dom/client";
import { ApolloProvider } from "@apollo/client";

import "./index.css";
import App from "./App";
import { client } from "./client";

const root = ReactDOM.createRoot(document.getElementById("root"));
root.render(
  <ApolloProvider client={client}>
    <App />
  </ApolloProvider>
);
6. Now we will use the same query we used in the Next JS example. So copy the Query.js file from there. It will be exactly the same.
7. In the App.js file with useQuery here. useQuery is hook from @apollo/client library.
  const { loading, error, data } = useQuery(GET_REPOSITORY, {
    variables: {
      username: "facebook",
      repository: "react",
    },
  });

  if (loading) return <p>Loading...</p>;
  if (error) return <p>Error : {error.message}</p>;
Here we are fetching the data of react repository data from facebook. And then we will console the data and the response will be the same.
GraphQL playground for GitHub API
If you want to explore the GitHub GraphQL API more you can head over to GitHub GraphQL Playground. Here you can explore the API and get all the available data from there. You can also check your previous queries here. To use the playground you have to log in here first with your GitHub account. And then you can run any query and check the response first before using it in your project. You can even pass query variables here at the bottom.
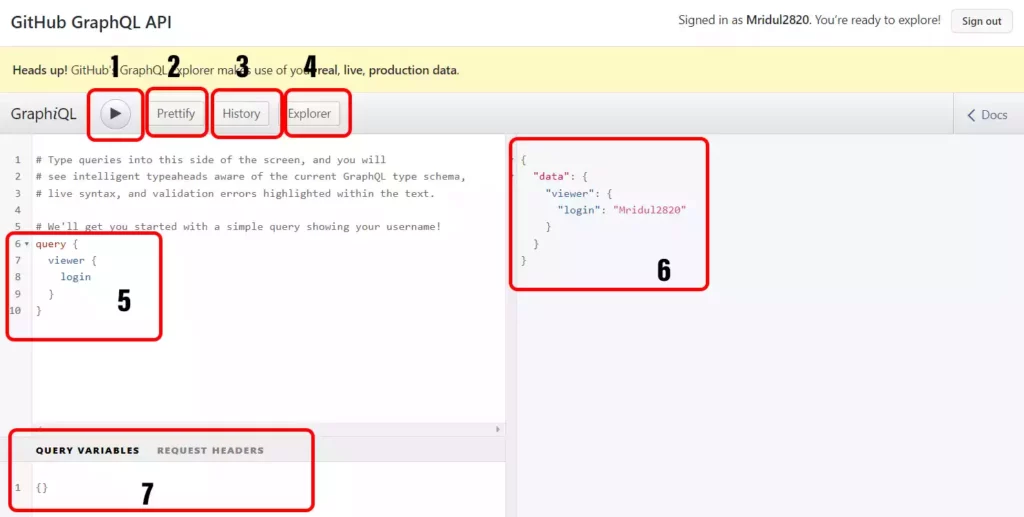
Let’s look at all the features of this playground
- With this play button, you can run your query and get the response
- You can even prettify your messy query into a formatted query with the pretty button
- You can have a look at the previously used queries with the History button
- The explorer button will take you to the available queries in the available in the GraphQL API
- In this section, you can write your query
- The query response will appear here
- If you want to pass any query variable you can pass it here.
You may also like
Next JS vs React: Which One Should You Choose?

Aug 30, 2025
·4 Min Read
When it comes to building web applications, React is one of the most popular frameworks out there. But with the emergence of Next JS, many developers are left wondering which one they should choose. In this article, we’ll see Next JS vs React to help you decide which one is best for your project. Next.js […]
How to add Styled components in Next.js App router

May 11, 2024
·4 Min Read
Styled components have become a popular choice for styling React applications due to their simplicity and flexibility. When it comes to integrating styled components into a Next.js application, it’s essential to understand how to leverage them effectively within the app router. In this guide, we’ll explore step-by-step how to add styled components to a Next.js […]
How to add Google Web Stories in Next JS

Dec 14, 2023
·10 Min Read
In the fast-paced digital world, user engagement is key to the success of any website. One effective way to captivate your audience is by incorporating Google Web Stories into your Next JS website. These visually appealing and interactive stories can make your content more engaging and shareable. In this comprehensive guide, we’ll walk you through […]
How to send Emails in Next JS for Free using Resend

Nov 10, 2023
·7 Min Read
Sending emails in web applications is a crucial feature, and in this article, we will explore how to send Emails in Next JS for free using Resend. Next JS is a popular framework for building React applications, and Resend is a handy tool for email integration. By the end of this guide, you’ll have the […]
How to add Google Login in Next.js with Appwrite

Nov 01, 2023
·7 Min Read
Are you looking to enhance user authentication in your Next.js application? Integrating Social Login with Appwrite can be a game-changer. Add Google Login to your Next.js app with Appwrite. This article will guide you through the process, and practical tips to add Google Login in Next.js with Appwrite. GitHub Code: Google Login in Next.js with […]
How to add Protected Routes in Next JS

Oct 28, 2023
·5 Min Read
In the world of web development, security is paramount. Whether you are building a simple blog or a complex web application, protecting certain routes and pages from unauthorized access is a crucial step. In this comprehensive guide, we will walk you through the process of adding protected routes in Next JS, ensuring that your web […]