Save Form data in Google Sheets with Next JS

Mridul Panda
Jul 10, 2022
·6 Min Read
In this post, we are going to make a simple contact form with Next JS and save Form data in Google Sheets. This form will have four files – Full Name, Email, Topic & Description.
Also Read: Next JS Project Ideas to Boost Your Portfolio
App Register for Google Sheet
Here are the detailed step-by-step instructions to register an app in Google console and save Form data in Google Sheets with screenshots:
- First, go to Google Developers Console and log in with your Google account
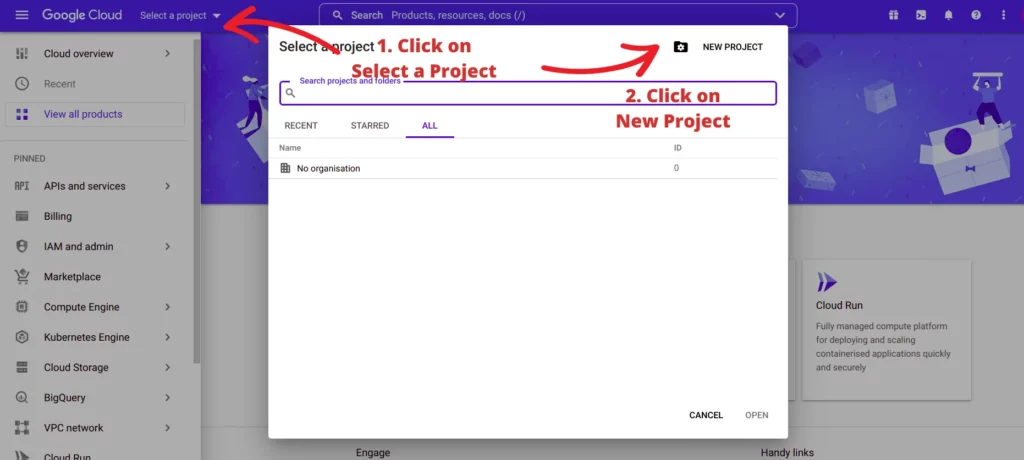
- Click on Select a Project and Click on New Project.
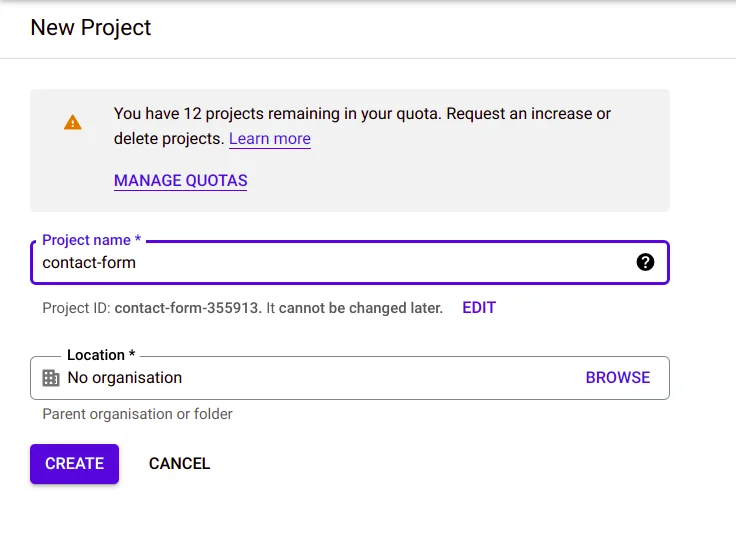
3. Give Your Project a name and click on create
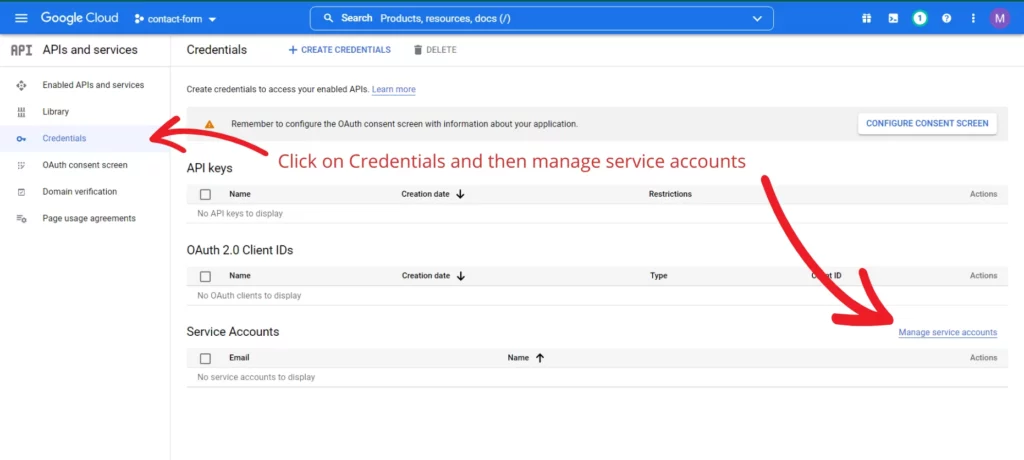
4. After that click on Credentials from the left side menu and click on manage service accounts
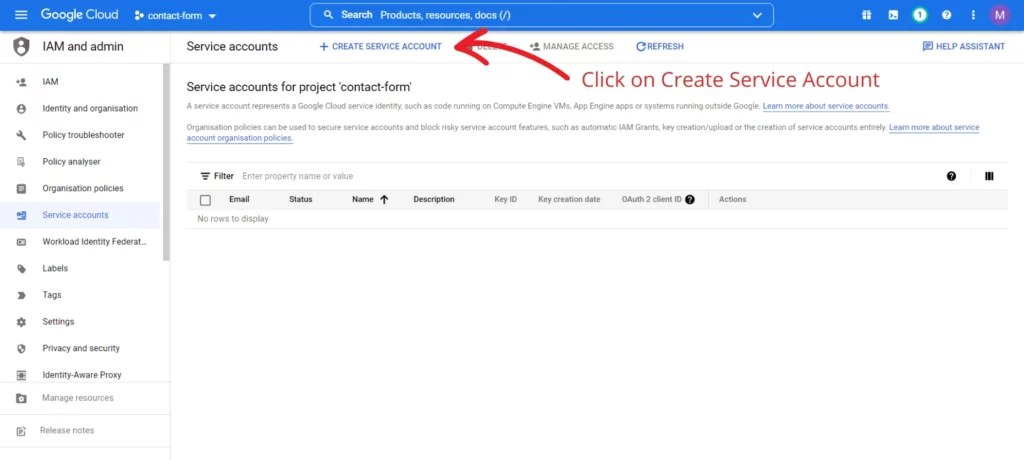
5. Click on create service account to create
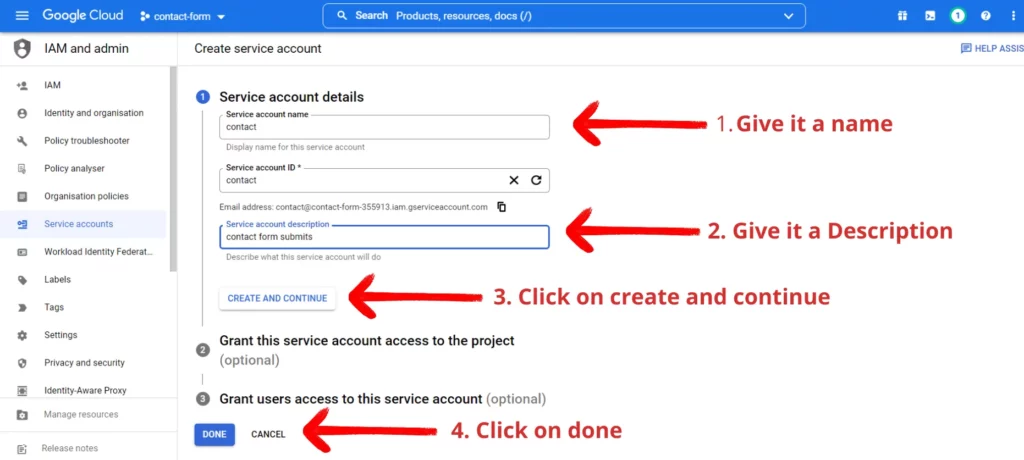
6. Give your service account a name, and a description and then click on Create and Continue. The second option is optional you can skip it. And now click on Done.
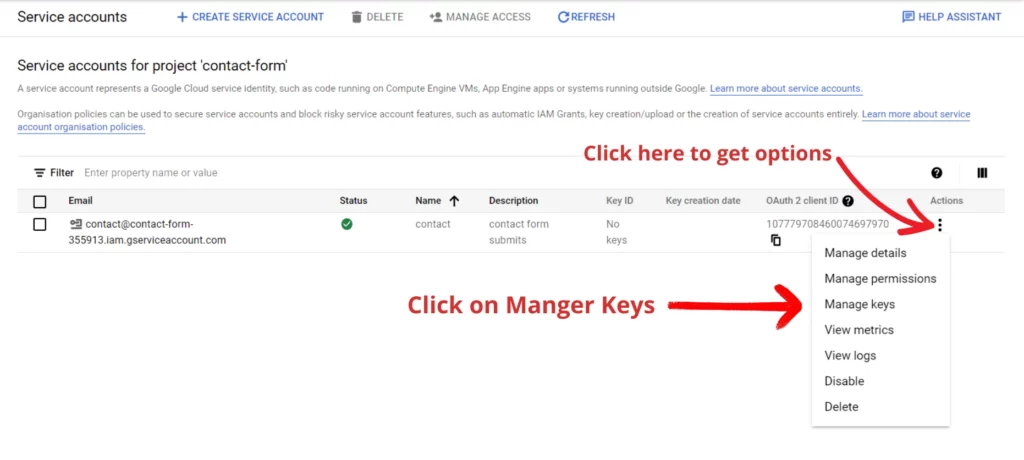
7. On your service account list click on three-dot on the right side and click on manage keys from options.
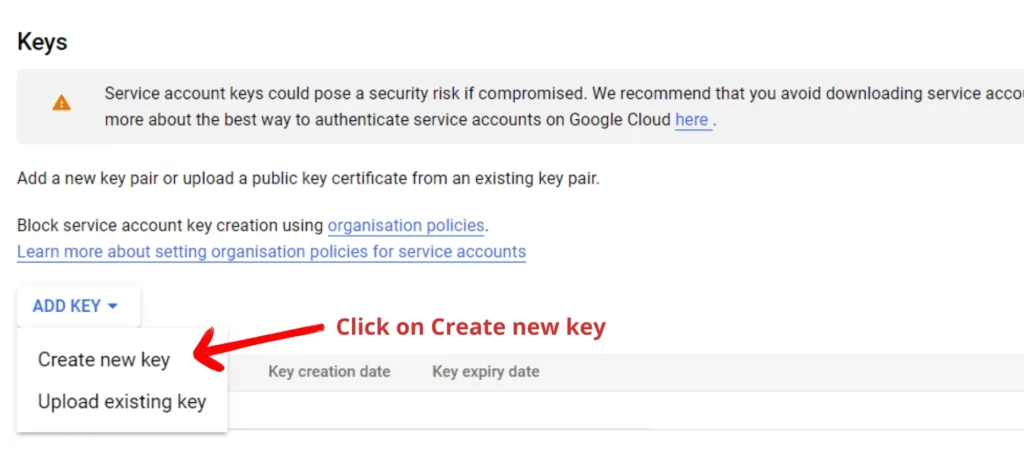
8. Click on Create New Key from add key button options
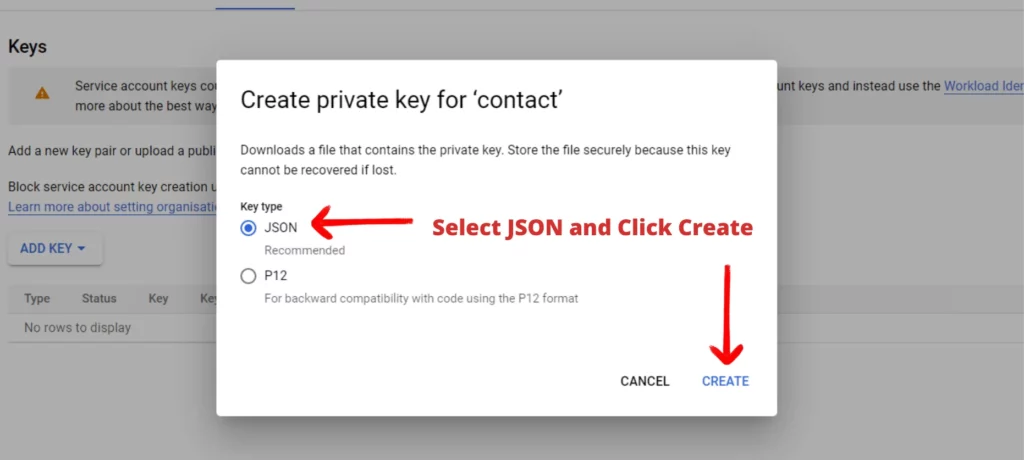
9. You will get a popup with 2 options. Select the JSON option and then click on create.
10. A JSON file will be downloaded with Private Key,email address and API Keys. These will be needed for form submits and post requests.
{
  "type": "service_account",
  "private_key": "-----BEGIN PRIVATE KEY----- -----END PRIVATE KEY----",
  "client_email": "some@email",
}
Google Spreadsheet create
11. Create a new Google Sheet from the same Google account that was used for creating the Google Console Project.
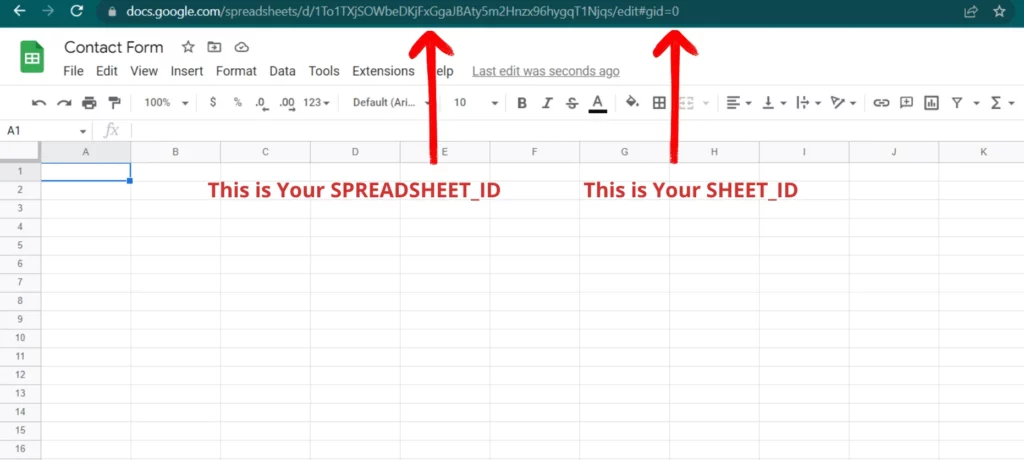
12. Give your sheet a name and save the SPREADSHEET_ID and SHEET_ID from the google sheet URL
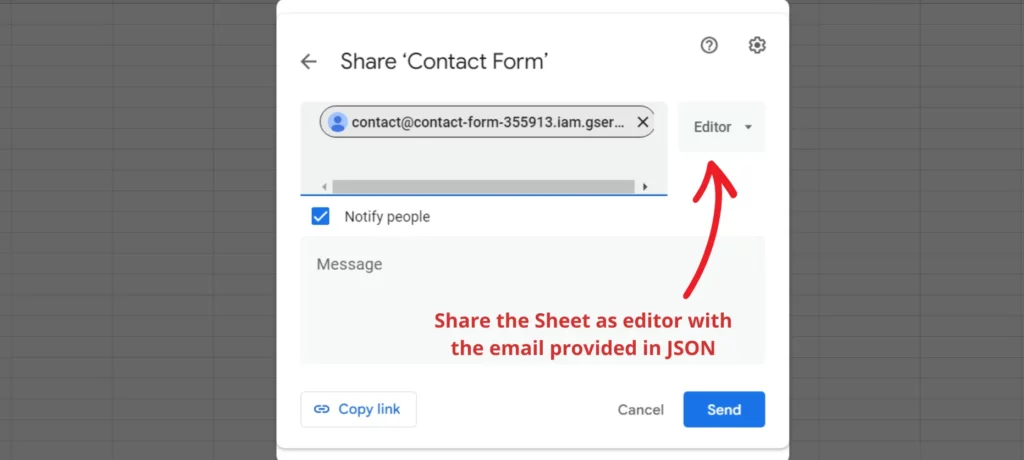
13. Share the Google Sheet with the email provided in the JSON file as Editor. This is important.
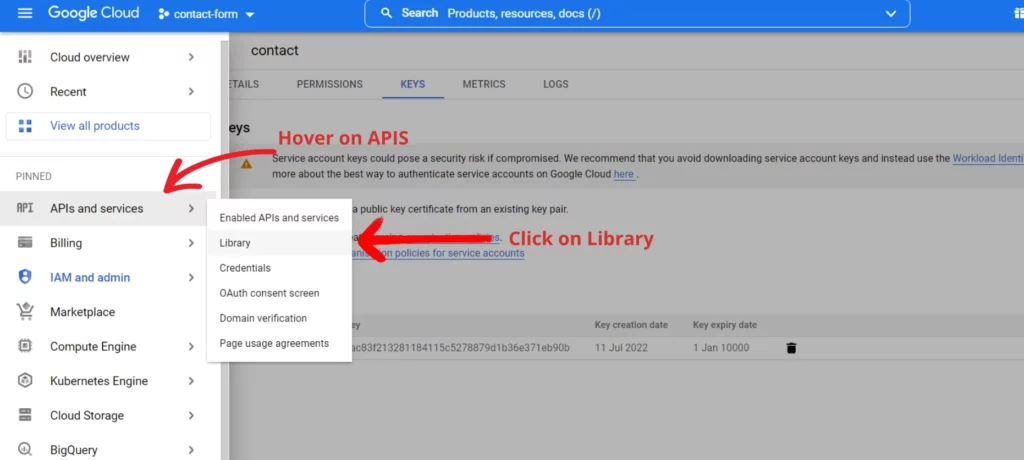
14. One more important step in Google Console. Click on the 3 bar on the top left side and find APIs and Services. From there Click on Library.
15. Search Sheet from the search bar and you’ll get Google Sheet on the first result. Click on it.
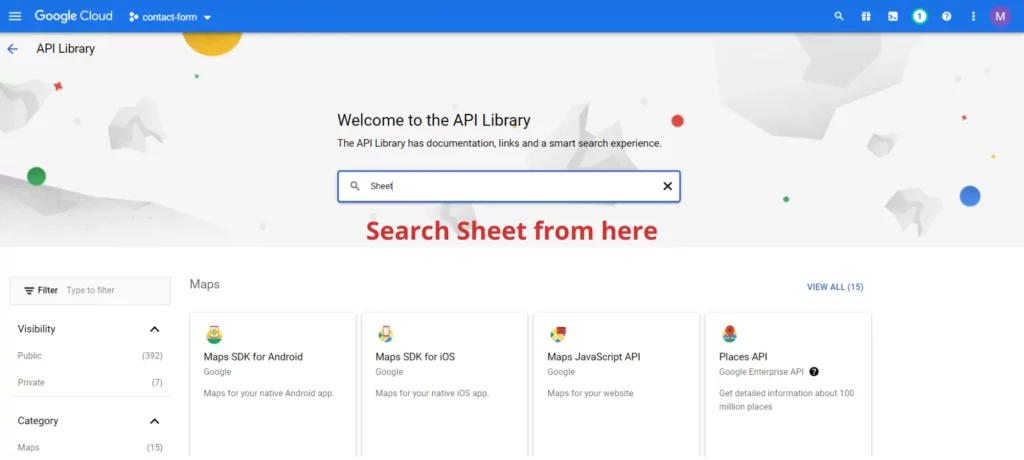
16. Enable Google Sheet API. This is an important step.

17. Important! Add your field names as heading in the Google Sheet

Now we are done with Google Console and Google Sheet Part
Also Read: How to Build PWA with Next JS?
Save Form data in Google Sheets
First, create a Next JS App with create-next-app command. We will create the app with a template. Use the following command to create the app.
npx create-next-app next-js-contact-from-google-sheet
#or
yarn create-next-app next-js-contact-from-google-sheet
This command will create a template Next JS application. We will make the form on the homepage. Next JS has its own folder-based routing system so in the pages folder create a file name index.js.
Our form will have four fields –
- Full Name
- Topic
- Description
Let’s create the form first. We are using Tailwind CSS here for styling. The form value is handled with React `useState`. The form fields are shown below in the index.js file.
// index.js
import React, { useState } from 'react';

const ContactForm = () => {
  const [form, setForm] = useState({
    name: '',
    email: '',
    topic: '',
    description: '',
  });

  const submitForm = (e) => {
    e.preventDefault();
  };

  const handleChange = (e) => {
    setForm({
      ...form,
      [e.target.name]: e.target.value,
    });
  };

  return (
    <form className="space-y-3 max-w-lg mx-auto p-5" onSubmit={submitForm}>
      <p className="font-semibold text-2xl text-center">Contact Form</p>
      <label className="block">
        <span className="text-gray-700 font-semibold">Full Name</span>
        <input
          name="name"
          type="text"
          className="form-input form-field-contact"
          placeholder="Full Name"
          onChange={handleChange}
        />
      </label>
      <label className="block">
        <span className="text-gray-700 font-semibold">Email</span>
        <input
          name="email"
          type="email"
          className="form-input form-field-contact"
          placeholder="Email"
          onChange={handleChange}
        />
      </label>
      <label className="block">
        <span className="text-gray-700 font-semibold">Topic</span>
        <input
          name="topic"
          type="text"
          className="form-input form-field-contact"
          placeholder="Topic"
          onChange={handleChange}
        />
      </label>
      <label className="block">
        <span className="text-gray-700 font-semibold">Description</span>
        <textarea
          name="description"
          className="form-textarea form-field-contact"
          rows="3"
          placeholder="Description"
          onChange={handleChange}
        />
      </label>

      <button
        className="bg-green-200 px-3 py-1 font-semibold shadow-md rounded-md"
        type="submit"
      >
        Send Message
      </button>
    </form>
  );
};

export default ContactForm;
Setting up Google Sheets in Next JS
To communicate with the Google Sheets API we need to install a package named google-spreadsheet. So let’s install the package.
npm i google-spreadsheet --save
# or
yarn add google-spreadsheet
As we are using Next JS to build the website, we need to add some extra configurations in our next.config.js. The configurations are for Webpack as we are using SSG.
// next.config.js
module.exports = {
  webpack: (config, { isServer }) => {
    if (!isServer) {
      config.resolve.fallback.fs = false;
      config.resolve.fallback.tls = false;
      config.resolve.fallback.net = false;
      config.resolve.fallback.child_process = false;
    }

    return config;
  },
};
Also Read: How to add Google AdSense in Next JS
We need to add our API key, Client Email, Spreadsheet ID and Key to env.local file. Next JS reads env variables like this. Add your details in env file
// .env.local
NEXT_PUBLIC_SPREADSHEET_ID =
NEXT_PUBLIC_SHEET_ID =
NEXT_PUBLIC_GOOGLE_CLIENT_EMAIL =
GOOGLE_SERVICE_PRIVATE_KEY =
The magical keyword NEXT_PUBLIC_ at the beginning of NEXT_PUBLIC_API_KEY denotes that this environment variable is not private and can be used by anyone.
But, GOOGLE_SERVICE_PRIVATE_KEY does not begin by NEXT_PUBLIC_ and will not be available to the general public. For this we have to add the variable in next.config.js like this
// next.config.js
module.exports = {
  env: {
    GOOGLE_SERVICE_PRIVATE_KEY: process.env.GOOGLE_SERVICE_PRIVATE_KEY,
  },
};
Now we will make the form submit handler
import { GoogleSpreadsheet } from 'google-spreadsheet';

// Config variables
const SPREADSHEET_ID = process.env.NEXT_PUBLIC_SPREADSHEET_ID;
const SHEET_ID = process.env.NEXT_PUBLIC_SHEET_ID;
const GOOGLE_CLIENT_EMAIL = process.env.NEXT_PUBLIC_GOOGLE_CLIENT_EMAIL;
const GOOGLE_SERVICE_PRIVATE_KEY =
  process.env.GOOGLE_SERVICE_PRIVATE_KEY;

// GoogleSpreadsheet Initialize
const doc = new GoogleSpreadsheet(SPREADSHEET_ID);

// Append Function
const appendSpreadsheet = async (row) => {
  try {
    await doc.useServiceAccountAuth({
      client_email: GOOGLE_CLIENT_EMAIL,
      private_key: GOOGLE_SERVICE_PRIVATE_KEY.replace(/\\n/g, '\n'),
    });
    // loads document properties and worksheets
    await doc.loadInfo();

    const sheet = doc.sheetsById[SHEET_ID];
    await sheet.addRow(row);
  } catch (e) {
    console.error('Error: ', e);
  }
};

const submitForm = (e) => {
  e.preventDefault();

  if (
    form.name !== '' &&
    form.email !== '' &&
    form.topic !== '' &&
    form.description !== ''
  ) {
    // Data add for append
    const newRow = {
      FullName: form.name,
      Email: form.email,
      Topic: form.topic,
      Description: form.description,
    };

    appendSpreadsheet(newRow);
  }
};
Tips on common issues
- Do not remove
----BEGIN PRIVATE KEY----or----END PRIVATE KEY----or anything else from your private key. - Enable Google Sheet API from the google console.
- Do this to your private key before using
process.env.GOOGLE_SERVICE_PRIVATE_KEY.replace(/\\n/g, '\n')This is it. Now after the form submit you will get the data the Google SpreadSheet.
You will get the full code of this on Github. Find more details on this Save Form data in Google Sheets with Next JS
You may also like
Types of APIs: A Complete Guide to API Categories

Aug 23, 2025
·3 Min Read
Have you ever wondered how your favorite apps talk to each other? Think about logging into a game with your Google account or paying through PayPal on an e-commerce site. That’s all possible because of APIs. They’re like digital messengers, making sure systems communicate smoothly. But did you know there are different types of APIs […]
Gemini CLI: Google’s Open Source AI Terminal Agent

Jun 26, 2025
·4 Min Read
Google has once again reshaped the future of developer productivity and AI-assisted coding by launching Gemini CLI, an open-source AI agent that seamlessly integrates the power of Gemini AI directly into your terminal. With 1,000 free requests per day, instant access to automated coding tasks, and the ability to generate images, videos, and website templates, […]
How to add Google Web Stories in Next JS

Dec 14, 2023
·10 Min Read
In the fast-paced digital world, user engagement is key to the success of any website. One effective way to captivate your audience is by incorporating Google Web Stories into your Next JS website. These visually appealing and interactive stories can make your content more engaging and shareable. In this comprehensive guide, we’ll walk you through […]
How to send Emails in Next JS for Free using Resend

Nov 10, 2023
·7 Min Read
Sending emails in web applications is a crucial feature, and in this article, we will explore how to send Emails in Next JS for free using Resend. Next JS is a popular framework for building React applications, and Resend is a handy tool for email integration. By the end of this guide, you’ll have the […]
How to add Google Login in Next.js with Appwrite

Nov 01, 2023
·7 Min Read
Are you looking to enhance user authentication in your Next.js application? Integrating Social Login with Appwrite can be a game-changer. Add Google Login to your Next.js app with Appwrite. This article will guide you through the process, and practical tips to add Google Login in Next.js with Appwrite. GitHub Code: Google Login in Next.js with […]
JavaScript Project Ideas to Boost Your Portfolio

Oct 13, 2023
·3 Min Read
JavaScript is the backbone of web development, and mastering it is essential for any aspiring developer. While learning the basics is crucial, building real-world projects is the key to solidifying your knowledge. In this comprehensive guide, we’ll present a diverse range of JavaScript project ideas that cater to different skill levels and interests. These projects […]