Explore the Advanced Image Features of Cloudinary

Mridul Panda
Apr 28, 2023
·6 Min Read

In today’s digital world, visual content is more important than ever. From websites to mobile apps, high-quality images can make or break the user experience. That’s where Cloudinary comes in. As a cloud-based image management solution, Cloudinary offers a wide range of advanced features for transforming and optimizing images. In this ultimate guide, we’ll explore the advanced Image Features of Cloudinary.
If you want the full code for this project you can find it on GitHub
Setting Up Your Cloudinary Account
1. Go to the Cloudinary website and sign up for a free account. You can log in if you have an account already.

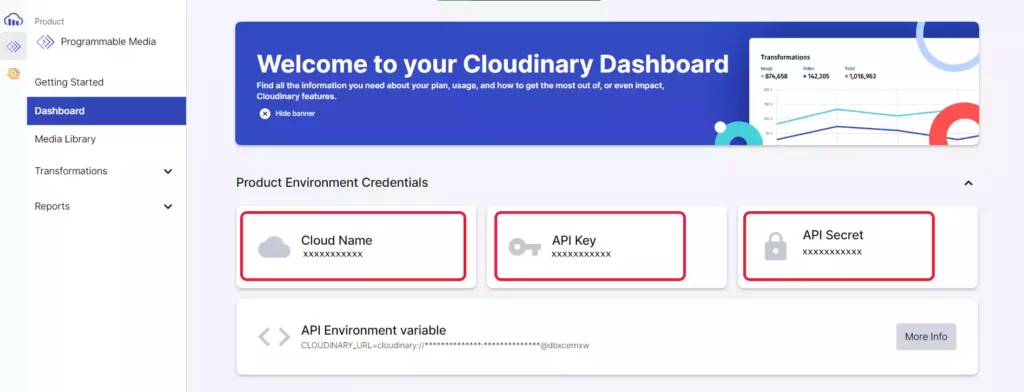
2. Once you’ve signed up, log in to your account and navigate to the Dashboard. In the Dashboard, you’ll see your Cloudinary Cloud Name, API Key, and API Secret. You’ll need these credentials to integrate Cloudinary with your React JS app. So copy these and save them somewhere else.
Installing and Setting Up Cloudinary React SDK
1. Now that you have your Cloudinary account set up, it’s time to install and set up the Cloudinary React SDK. It’s the official SDK from Cloudinary. Install the Cloudinary React SDK using npm or yarn
npm install cloudinary-react
#or
yarn add cloudinary-react
2. The Cloudinary API key includes a cloud name, API key, and API secret which we have got after signing up in Cloudinary. We need to add these credentials to our React JS application. We can do this by creating a .env file in the root of our project and adding the following lines.
// .env
REACT_APP_CLOUDINARY_CLOUD_NAME=your_cloud_name
REACT_APP_CLOUDINARY_API_KEY=your_api_key
REACT_APP_CLOUDINARY_API_SECRET=your_api_secret
REACT_APP_CLOUDINARY_UPLOAD_PRESET=your_preset_name
If you want to know about this in detail check out How to Upload Images to Cloudinary With React JS
Advanced Image Features of Cloudinary
We have a Cloudinary account and we have installed the Cloudinary React SDK. Now we can dive into the Advanced Image Features of Cloudinary. This advanced feature includes image cropping, face detection, image filter and many more.
If you want the detailed code for these features you can find it on GitHub.
You can also check all the examples of features in the demo
In the code examples, you’ll find CLOUD_NAME which is basically the cloud name which is saved in .env file.
const CLOUD_NAME = process.env.REACT_APP_CLOUDINARY_CLOUD_NAME;
The url is the image public_id for the image which can get in the Cloudinary. You can also get a public_id in response after uploading the image to CLoudinary.
1. Resizing and Cropping Images in Cloudinary
You can easily resize and crop images using Cloudinary’s image manipulation features. You can specify the width, height, and crop mode to achieve the desired result. For example, if you want to resize an image to a width of 500 pixels and crop it to fit, you can use the following code:
<Image
  cloudName={CLOUD_NAME}
  publicId={url}
  width="500"
  crop="scale"
/>
2. Applying Filters and Effects with Cloudinary
Cloudinary provides a wide range of filters and effects that you can apply to your images. For example, you can apply a grayscale filter to an image by adding the “effect” attribute to the Image component:
<Image
  cloudName={CLOUD_NAME}
  publicId={url}
  effect="grayscale"
/>
3. Adjusting Image Quality with Cloudinary
You can optimize your images for the web by adjusting the image quality. Cloudinary automatically compresses images to reduce file size without sacrificing quality. You can use the “quality” attribute to specify the desired level of compression. For example, to automatically optimize the image for the web, you can use the following code:
<Image
  cloudName={CLOUD_NAME}
  publicId={url}
  quality="auto"
/>
Also Read: Creating a Stunning Image Gallery using React Image Gallery
4. Converting image formats with Cloudinary
You can convert images to different formats using Cloudinary’s format conversion features. For example, you can convert a JPEG image to a PNG image by adding the “format” attribute to the Image component:
<Image
  cloudName={CLOUD_NAME}
  publicId={url}
  format="png"
/>
5. Adding Watermarks with Cloudinary
Cloudinary-React also supports adding watermarks to your images to protect them from unauthorized use or to promote your brand. The overlay transformation option allows you to add an image or text as a watermark on top of your original image. Here’s an example
<Image
  cloudName={CLOUD_NAME}
  publicId={url}
  transformation={{
    width: 400,
    height: 400,
    crop: 'thumb',
    overlay: {
      font_family: 'Arial',
      font_size: 40,
      text: 'My Watermark',
    },
  }}
/>
Also Read: 10 React Project Ideas to Boost Your Portfolio
6. Face detection and recognition with Cloudinary
Cloudinary provides built-in support for face detection and recognition. You can use the “gravity” attribute to automatically crop an image to focus on faces. You can also use the “faces” attribute to retrieve information about faces detected in an image. For example, you can use the following code to crop an image to focus on faces:
<Image
  cloudName={CLOUD_NAME}
  publicId={url}
  transformation={{
    width: 400,
    height: 400,
    crop: "thumb",
    face: "auto",
  }}
/>
7. Text and image overlays with Cloudinary
You can add text and image overlays to your images using Cloudinary’s overlay features. You can specify the position, size, and opacity of the overlay. For example, to add a text overlay to the top-left corner of an image, you can use the following code:
<Image
  cloudName={CLOUD_NAME}
  publicId={PUBLIC_ID}
  overlay="text:arial_30_bold:Hello World!"
  gravity="north_west"
/>
Also Read: Top 5 Websites for Free and Beautiful Stock Images
8. Blur Faces with Cloudinary
Another useful feature of Cloudinary-React is the ability to blur faces in an image. This can be useful for protecting the privacy of individuals in images, especially in cases where the images are used for public display or sharing. Here’s an example:
<Image
  cloudName={CLOUD_NAME}
  publicId={url}
  transformation={{
    width: 400,
    height: 400,
    crop: 'thumb',
    effect: 'pixelate_faces',
    gravity: 'auto',
  }}
/>
9. Image Placeholder with Cloudinary
Cloudinary-React supports image placeholders, which can help to improve the perceived performance of your application by displaying a low-resolution version of the image while the full-sized version is loading. Here’s an example:
<Image
   cloudName="demo"
   publicId="sample"
   placeholder="blur"
/>
Also Read: Top 5 Free APIs for Your Next Project
10. Multiple Transformation with Cloudinary
With Cloudinary-React, you can chain multiple transformations together to create complex image transformations. Here’s an example:
<Image
  cloudName={CLOUD_NAME}
  publicId={url}
  transformation={{
    width: 400,
    height: 400,
    crop: "fill",
    effect: "brightness:20",
    angle: 45,
    border: "2px_solid_black",
  }}
/>
These are just a few more examples of the advanced features that Cloudinary offers for transforming and optimizing images. By using these features, you can create customized and optimized images for your application with ease.
You may also like
Types of APIs: A Complete Guide to API Categories

Aug 23, 2025
·3 Min Read
Have you ever wondered how your favorite apps talk to each other? Think about logging into a game with your Google account or paying through PayPal on an e-commerce site. That’s all possible because of APIs. They’re like digital messengers, making sure systems communicate smoothly. But did you know there are different types of APIs […]
Gemini CLI: Google’s Open Source AI Terminal Agent

Jun 26, 2025
·4 Min Read
Google has once again reshaped the future of developer productivity and AI-assisted coding by launching Gemini CLI, an open-source AI agent that seamlessly integrates the power of Gemini AI directly into your terminal. With 1,000 free requests per day, instant access to automated coding tasks, and the ability to generate images, videos, and website templates, […]
How to add Google Web Stories in Next JS

Dec 14, 2023
·10 Min Read
In the fast-paced digital world, user engagement is key to the success of any website. One effective way to captivate your audience is by incorporating Google Web Stories into your Next JS website. These visually appealing and interactive stories can make your content more engaging and shareable. In this comprehensive guide, we’ll walk you through […]
How to send Emails in Next JS for Free using Resend

Nov 10, 2023
·7 Min Read
Sending emails in web applications is a crucial feature, and in this article, we will explore how to send Emails in Next JS for free using Resend. Next JS is a popular framework for building React applications, and Resend is a handy tool for email integration. By the end of this guide, you’ll have the […]
How to add Google Login in Next.js with Appwrite

Nov 01, 2023
·7 Min Read
Are you looking to enhance user authentication in your Next.js application? Integrating Social Login with Appwrite can be a game-changer. Add Google Login to your Next.js app with Appwrite. This article will guide you through the process, and practical tips to add Google Login in Next.js with Appwrite. GitHub Code: Google Login in Next.js with […]
JavaScript Project Ideas to Boost Your Portfolio

Oct 13, 2023
·3 Min Read
JavaScript is the backbone of web development, and mastering it is essential for any aspiring developer. While learning the basics is crucial, building real-world projects is the key to solidifying your knowledge. In this comprehensive guide, we’ll present a diverse range of JavaScript project ideas that cater to different skill levels and interests. These projects […]