How to Upload Images to Cloudinary With React JS

Mridul Panda
Apr 05, 2023
·6 Min Read

Are you struggling to upload images in your React JS application? Are you tired of the tedious process of configuring file uploads and handling image storage? If so, you are not alone. Many developers find image management in web applications to be a challenge. Fortunately, Cloudinary offers an easy solution. In this article, we will show you how to upload images to Cloudinary with React JS.
Introduction to Cloudinary
Cloudinary is a cloud-based image and video management platform that provides developers with a powerful set of tools for image upload, transformation, optimization, and delivery. With Cloudinary, developers can easily upload, store, manipulate, and deliver images and videos in a fast, efficient, and secure manner. Cloudinary offers a robust API, integrations with popular frameworks and libraries, and a user-friendly dashboard that makes image management a breeze.
If you want the full code for this project you can find it on GitHub
Setting Up Your Cloudinary Account
1. Go to the Cloudinary website and sign up for a free account. You can log in if you have an account already.

2. Once you’ve signed up, log in to your account and navigate to the Dashboard. In the Dashboard, you’ll see your Cloudinary Cloud Name, API Key, and API Secret. You’ll need these credentials to integrate Cloudinary with your React JS app. So copy these and save them somewhere else.

3. Now we need to change some settings in order to work the upload process. Go to settings and navigate to upload from the sidebar. Now scroll down a bit and you’ll see the Upload presets section. Click on the Add Upload preset.
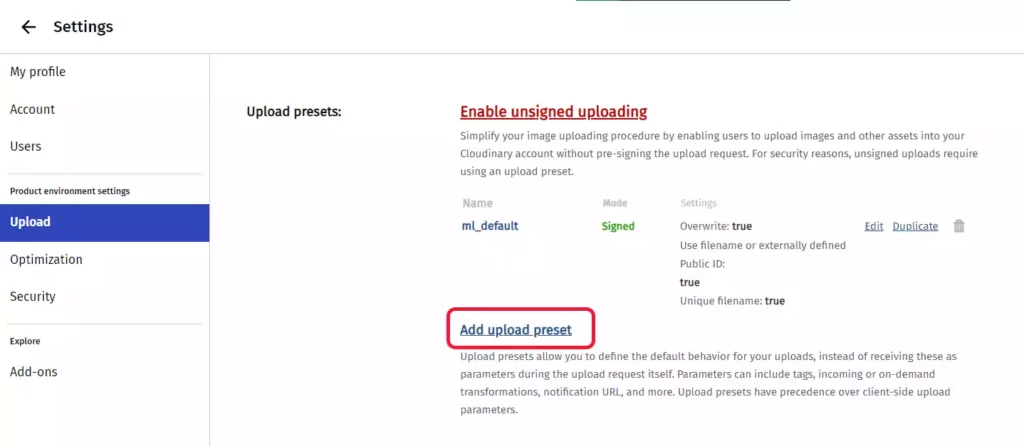
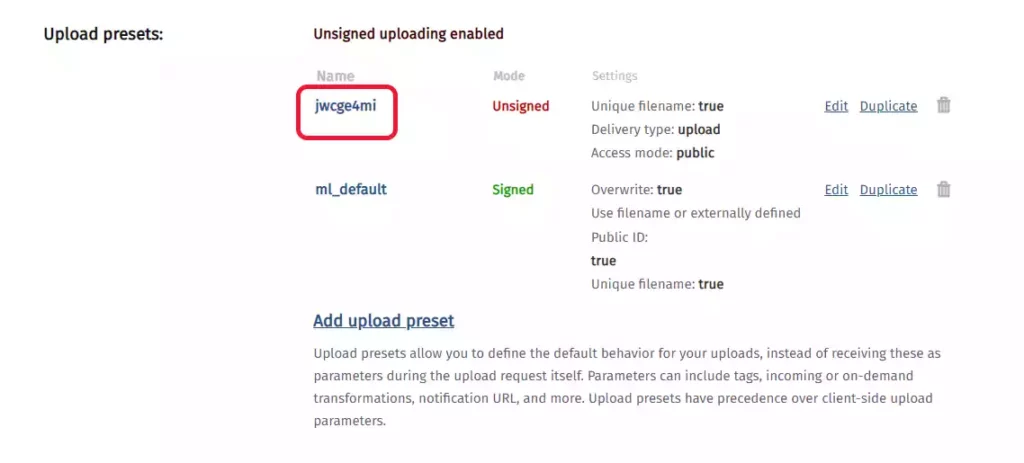
4. Now click on the Signing Mode dropdown and select the unsigned option and click on the save button in the nav.

5. Now copy the Upload preset name. We will need this later.
Also Read: 10 React Project Ideas to Boost Your Portfolio
Installing and Setting Up Cloudinary React SDK
1. Now that you have your Cloudinary account set up, it’s time to install and set up the Cloudinary React SDK. It’s the official SDK from Cloudinary. Install the Cloudinary React SDK using npm or yarn
npm install cloudinary-react
#or
yarn add cloudinary-react
2. The Cloudinary API key includes a cloud name, API key, and API secret which we have got after signing up in Cloudinary. We need to add these credentials to our React JS application. We can do this by creating a .env file in the root of our project and adding the following lines.
// .env
REACT_APP_CLOUDINARY_CLOUD_NAME=your_cloud_name
REACT_APP_CLOUDINARY_API_KEY=your_api_key
REACT_APP_CLOUDINARY_API_SECRET=your_api_secret
REACT_APP_CLOUDINARY_UPLOAD_PRESET=your_preset_name
Also Read: Top 5 CSS Libraries for Web Developers in 2023
Uploading Images to Cloudinary with React JS
Now that we have configured Cloudinary, we can start creating our image upload component. We can create a new file called ImageUpload.js in the src folder of our project and add the following code.
import React, { useState } from "react";
const ImageUpload = () => {
const [image, setImage] = useState(null);
const [url, setUrl] = useState("");
const [loading, setLoading] = useState(false);
const [preview, setPreview] = useState(null);
const uploadImage = async () => {
setLoading(true);
const data = new FormData();
data.append("file", image);
data.append(
"upload_preset",
process.env.REACT_APP_CLOUDINARY_UPLOAD_PRESET
);
data.append("cloud_name", process.env.REACT_APP_CLOUDINARY_CLOUD_NAME);
data.append("folder", "Cloudinary-React");
try {
const response = await fetch(
`https://api.cloudinary.com/v1_1/${process.env.REACT_APP_CLOUDINARY_CLOUD_NAME}/image/upload`,
{
method: "POST",
body: data,
}
);
const res = await response.json();
setUrl(res.public_id);
setLoading(false);
} catch (error) {
setLoading(false);
}
};
const handleImageChange = (event) => {
const file = event.target.files[0];
setImage(file);
const reader = new FileReader();
reader.readAsDataURL(file);
reader.onload = () => {
setPreview(reader.result);
};
};
const handleResetClick = () => {
setPreview(null);
setImage(null);
};
return (
<div className="h-screen sm:px-8 md:px-16 sm:py-8">
<div className="container mx-auto max-w-screen-lg h-full">
<header className="border-dashed border-2 border-gray-400 py-12 flex flex-col justify-center items-center">
<p className="mb-3 font-semibold text-gray-900 flex flex-wrap justify-center">
<span>Click on Upload a File</span>
</p>
<input
id="hidden-input"
type="file"
className="hidden"
onChange={handleImageChange}
accept="image/*"
/>
<label htmlFor="hidden-input" className="cursor-pointer">
<div className="mt-2 rounded-sm px-3 py-1 bg-gray-200 hover:bg-gray-300 focus:shadow-outline focus:outline-none">
Upload a file
</div>
</label>
<div className="flex justify-center items-center mt-5 mx-3 max-w-xs">
{preview && <img src={preview} alt="preview" className="w-full" />}
</div>
</header>
<div className="flex justify-end pb-8 pt-6 gap-4">
<button
onClick={uploadImage}
className="rounded-sm px-3 py-1 bg-blue-700 hover:bg-blue-500 text-white focus:shadow-outline focus:outline-none disabled:cursor-not-allowed"
disabled={!image}
>
Upload now
</button>
<button
onClick={handleResetClick}
className="rounded-sm px-3 py-1 bg-red-700 hover:bg-red-500 text-white focus:shadow-outline focus:outline-none"
>
Reset
</button>
</div>
{loading ? (
<div className="flex items-center justify-center gap-2">
<div className="border-t-transparent border-solid animate-spin rounded-full border-blue-400 border-4 h-6 w-6"></div>
<span>Processing...</span>
</div>
) : (
url && (
<div className="pb-8 pt-4">
<Image
cloudName={process.env.REACT_APP_CLOUDINARY_CLOUD_NAME}
publicId={url}
/>
</div>
)
)}
</div>
</div>
);
};
export default ImageUpload;
In the code above, we completed the ImageUpload component by adding the closing bracket for the Image component and exporting the ImageUpload component. Now, the component can be imported and used in other parts of the application. This is how the upload component looks like –

Also Read: Best Chrome Extensions for Web Developers
Displaying Images from Cloudinary with React JS
1. Import the Image component from the Cloudinary React SDK:
import { Image } from 'cloudinary-react';2. Now that we have successfully uploaded the image to Cloudinary, we can display it in our React JS application. We can add the following code to our ImageUpload component. For styling, we are using Tailwind CSS.
return (
  {loading ? (
    <div className="flex items-center justify-center gap-2">
      <div className="border-t-transparent border-solid animate-spin rounded-full border-blue-400 border-4 h-6 w-6"></div>
      <span>Processing...</span>
    </div>
  ) : (
    url && (
      <div className="pb-8 pt-4">
        <Image
          cloudName={process.env.REACT_APP_CLOUDINARY_CLOUD_NAME}
          publicId={url}
        />
      </div>
    )
  )}
);
If you want the full code for this project you can find it on GitHub
Troubleshooting: Common Issues and Solutions
If you run into issues while uploading or displaying images with Cloudinary and React JS, here are some common solutions:
- Make sure your Cloudinary credentials are correct and up-to-date.
- Check that your upload preset is configured correctly.
- Verify that your public ID is correct when displaying images.
- Clear your browser cache if images are not displaying properly.
Conclusion
In this article, we showed you how to upload images to Cloudinary with React JS. We started by introducing Cloudinary and its features. Then we set up a new React JS project and configured Cloudinary. Next, we created an image upload component that uses the Cloudinary API to upload images. Finally, we displayed the uploaded image in our React JS application.
Using Cloudinary with React JS makes image management in web applications much easier. With its powerful set of features and easy-to-use API, developers can focus on building great applications without worrying about the complexities of image upload, storage, and delivery.
You may also like
Next JS vs React: Which One Should You Choose?

Aug 30, 2025
·4 Min Read
When it comes to building web applications, React is one of the most popular frameworks out there. But with the emergence of Next JS, many developers are left wondering which one they should choose. In this article, we’ll see Next JS vs React to help you decide which one is best for your project. Next.js […]
React Hooks Cheatsheet

Jan 21, 2024
·4 Min Read
React, a popular JavaScript library for building user interfaces, introduced Hooks to make functional components more powerful and expressive. Let’s dive into the React Hooks Cheatsheet to understand how they enhance the development experience. React Hooks Cheatsheet In the ever-evolving landscape of web development, React Hooks have become indispensable for building dynamic and efficient user […]
React Emoji Picker: Add Emoji Picker in a React App

May 18, 2023
·3 Min Read
Emojis have become a staple in modern communication, with people using them to convey emotions and ideas in various contexts. As such, it’s important for developers to provide users with an easy and intuitive way to input emojis into their applications. This is where the React Emoji Picker comes in handy. This tool simplifies the […]
Creating a Stunning Image Gallery using React Image Gallery

Apr 19, 2023
·5 Min Read
When it comes to building a website, a visually appealing image gallery can make a huge difference in the overall user experience. React Image Gallery is a popular and flexible Reactjs component library that can help you create a stunning gallery for your website. In this article, we will explore the features of React Image […]
Top 5 Platforms to Host React Apps for Free

Apr 11, 2023
·7 Min Read
Learn about the best platforms to host your React apps for free. This guide will help you choose the right platform that suits your needs.
How to Create a React Search Bar for Your Website

Mar 18, 2023
·6 Min Read
A search bar is an essential component of any website, allowing visitors to find the information they need quickly. If you are building a website using React, you can easily create a search bar to improve the user experience. In this article, we will guide you through the process of creating a React search bar […]